
In the modern digital information display arena, LED screens have gained extensive applications across diverse scenarios, thanks to their numerous advantages such as high brightness, high definition, vivid colors, and flexible customization.
From large-scale advertising screens on bustling city streets to high-definition display devices in conference rooms and stunning backdrop screens for stage performances, LED screens are ubiquitous.
However, like any electronic device, they are prone to various malfunctions during long-term use, affecting normal display and information transmission.
Let’s delve into repairing various LED screen faults.

Analysis of the Basic Structure and Working Principle of LED Screens
Basic Structure
- LED Lamp Beads: Core light-emitting components whose quality directly impacts display effects, varying in brightness, color, and lifespan across models.
- Driver Circuit: Provides stable current drive for LED lamp beads, critical to screen performance stability.
- Control System: Comprises control cards and software, receiving external signals (e.g., video, images) and converting them into instructions to control lamp bead on/off and light intensity.
- Power Supply System: Supplies power to the entire screen; stable power is fundamental to normal operation.
- Heat Dissipation System: Dissipates heat generated by lamp beads during operation, ensuring stable performance and extending lifespan.
Working Principle
LED screens receive external signals via the control system, process them, and transmit to the driver circuit, which controls lamp bead on/off and light intensity to display images and text.
Detailed Analysis of Common Fault Types
Display Abnormality
No Display (Black Screen)
- Possible Causes: Power supply failures (damaged supplies, loose cords, low voltage); signal source issues (malfunctioning devices, damaged cables); control system faults (damaged cards, software errors).
- Analysis Approach: Check power indicator first. If off, troubleshoot power. If power is normal, verify signal source output by replacing the device. If signal source is fine, check the control system—restart the control card or reinstall software.
Partial Area Not Lit
- Possible Causes: Damaged LED lamp beads (due to long-term use, overheating, overcurrent); faulty driver chips (aging, overheating, electrostatic damage); ribbon cable connection issues (loose, broken).
- Analysis Approach: Observe the unlit area. Single or a few unlit beads likely indicate damaged beads. An entire row/column out may signal driver chip or ribbon cable problems. Use a multimeter to test beads, chips, and cable connectivity.
Display Content Disorder (Skewed or Distorted Images)
- Possible Causes: Control system failures (program errors, memory issues); signal transmission problems (cable interference, excessive distance causing attenuation); software setting errors (improper resolution, refresh rate).
- Analysis Approach: Check for control card error prompts or indicator flashes. Update the control card program. Ensure signal cables are secure; use shielded cables to reduce interference. Verify software settings match screen parameters and reset resolution/refresh rate.
-
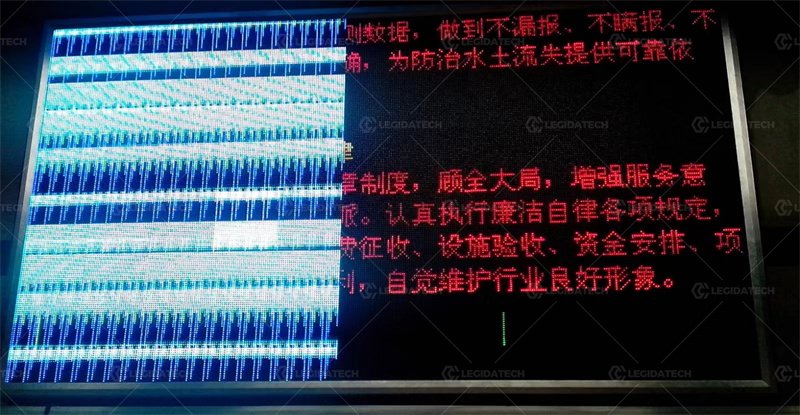
led-vertical-stripe-fault-example
Color-related Problems
Color Distortion
- Possible Causes: Aged LED lamp beads (changed light-emitting characteristics); improper color calibration (initial settings or lack of timely calibration); driver circuit faults (affecting driving current, causing color deviation).
- Analysis Approach: Compare normal and distorted areas to determine if distortion is overall or local. For overall distortion, recalibrate colors. For local distortion, check beads and driver circuit in the area.
Uneven Brightness
- Possible Causes: Quality differences in lamp beads (inconsistent brightness across batches/brands); uneven driving current (parameter differences or circuit faults); uneven heat dissipation (local overheating affecting light efficiency).
- Analysis Approach: Observe brightness distribution. Random unevenness may indicate bead quality issues. Regional unevenness requires checking the driver circuit and heat dissipation in the area.
-
led-screen-flickering-phenomenon
Stability Issues
Flickering
- Possible Causes: Unstable power supply (voltage fluctuations, high ripple); signal transmission interference (nearby electromagnetic sources); degraded lamp bead/driver chip performance (aging, overheating).
- Analysis Approach: Test with a regulated power supply to see if flickering improves (to identify power issues). Check for interference sources around signal lines and use shielding. If persistent, replace beads or chips.
Display Delay
- Possible Causes: Inadequate control system processing capacity (low-performance cards unable to handle large data quickly); network delay (insufficient bandwidth or congestion during network signal transmission).
- Analysis Approach: Check control card configuration parameters. Upgrade hardware/software. Optimize the network environment—increase bandwidth and reduce nodes to lower delay.
Preparation of Repair Tools and Materials
Essential Tools
- Multimeter: Measures voltage, current, resistance to assess component quality and circuit connectivity.
- Soldering Iron and Solder Wire: For soldering/desoldering components (e.g., beads, chips).
- Hot Air Gun: For replacing surface-mounted components (e.g., beads, chips) by providing uniform heat.
- Tweezers: Picks up small components (beads, resistors, capacitors) for soldering.
- Test Card: Detects basic display functions to identify if faults lie in the screen or control system.
-

led-screen-repair-tools
Common Materials
- Spare LED Lamp Beads: Various models for replacing damaged ones.
- Driver Chips: Common models for replacing faulty chips.
- Ribbon Cables: Various specifications for replacing damaged/loose cables.
- Power Cords: Different specifications for repairing power line issues.
- Thermal Conductive Silicone Grease: Enhances heat dissipation when replacing components or addressing heat issues.
Repair Process and Operation Steps
Fault Diagnosis
- Observe the Phenomenon: Carefully note fault symptoms (display content, color, brightness, flickering) and record details.
- Interview the User: Ask about operations and environmental changes before/after the fault for clues.
- Preliminary Inspection: Check power supply, signal source, and cables for loose connections or damage.
Fault Identification
- Use Tools for Detection: Use a multimeter and test card to inspect suspected components and locate faults.
- Analyze the Cause: Combine detection results with the screen’s working principle to determine the fault cause and formulate a repair plan.
Repair Implementation
- Replace Damaged Components: Use soldering iron and hot air gun to replace faulty beads, chips, or cables.
- Repair Circuit Problems: Solder to fix short circuits or open circuits, ensuring connectivity.
- Software Debugging: Reset parameters, update programs, or recalibrate colors for control system/software issues.
Testing and Verification
- Power-on Testing: After repair, power on to check display and confirm fault elimination.
- Function Testing: Test functions (displaying images/text, adjusting brightness/contrast) to ensure normal operation.
- Stability Testing: Run the screen long-term to check for stable operation and recurrence of faults.
Repair Case Sharing and Experience Summary
Case 1: Partial Unlit Area on an Outdoor Mall LED Advertising Screen
- Fault Phenomenon: Block-shaped unlit area in the lower-right corner.
- Repair Process: Checked ribbon cable connections (no issues), tested beads with a multimeter (abnormal resistance indicated damage), replaced beads with a hot air gun and tweezers—display restored.
- Experience: Outdoor screens face harsh environments, making beads prone to damage from overheating or humidity. Strengthen protection and heat dissipation, and regularly inspect beads.
-

led-black-screen-fault-demo
Case 2: Flickering LED Display in a Conference Room
- Fault Phenomenon: Frequent flickering during meetings.
- Repair Process: Replaced power supply (flickering persisted), found signal cable near high-power appliances causing electromagnetic interference. Rewired, moved the cable, and used shielded cables—flickering stopped.
- Experience: Plan signal and power lines to avoid interference during installation. Preemptively address environmental interference sources.
Preventive Measures and Daily Maintenance Suggestions
Preventive Measures
- Proper Installation: Choose a suitable environment (avoid high temperature, humidity, and electromagnetic interference). Ensure firm installation to prevent shaking/impact.
- Stable Power Supply: Use high-quality power equipment with voltage stabilizers to prevent damage from fluctuations.
- Signal Protection: Shield signal cables to reduce interference and attenuation.
- Heat Dissipation Management: Maintain the heat dissipation system; clean dust from fans and radiators regularly for optimal cooling.
Daily Maintenance
- Regular Cleaning: Wipe the screen surface with a soft cloth to remove dust and debris.
- Connection Inspection: Check power, signal, and ribbon cable connections for tightness and oxidation.
- Performance Detection: Use test cards regularly to identify potential issues.
- Software Update: Update control system software and drivers for better performance and compatibility.
At LEGIDATECH, our professional LED screen repair and after-sales service team excels in diagnosing complex faults and providing efficient solutions. We use high-quality spare parts and advanced tools to restore your screen to optimal performance, offering comprehensive warranties and 24/7 technical support. Trust us to keep your LED screens shining brightly!


Author:Amy